

Building Multi-Tenant Apps using AWS Cognito
Building Multi-Tenant Apps using AWS Cognito

Abraham Sultan
Abraham Sultan November 25, 2019
Intro
Cognito is a fully managed identity broker service provided by AWS. Cognito can be used to broker identity with many of the popular social identity services as well as any SAML provider. In this post we are going to describe how it can be used to provide authentication/authorization for a single instance, multi-tenant application; but first, let’s set some context:
Suppose you are building an enterprise web application and would like to allow your customers to log in to the application using their corporate identity and credentials. Also, let’s assume we are going to create a unique domain name through which each one of our customers will access the application.
App Composition
Before we dive in deeper, let’s identify the main components of our application. As a typical 3-tier application, our app will be composed of a UI, a Service Layer with one or more micro-services and a Storage/Data Layer.
Layer: UI
For our fictitious app, let’s assume our UI layer is composed of a single page app written in React with Typescript
Layer: Service Layer
Our business logic is going to be encapsulated as a set of micro-services exposed via a set of RESTful APIs. The UI will talk to this layer to perform server side actions.
Layer: Storage Layer
This layer is not terribly relevant for this post but for the sake of completeness, let’s assume it is a relational data store backed by PostgreSQL. This layer is only exposed to the Service Layer and not directly to the UI.
AWS Service
In addition to our application-level components, we are going to use a few AWS services to help us host and manage the application. Let’s call them out:
AWS Service: API Gateway
Purpose: We are going to use this service to help us expose our service layer and offload authentication.
AWS Service: AWS Lambda
Purpose: Lambdas are small pieces of code that can be executed without having to worry about managing the servers that are running your code. Any further detail on Lambdas is outside of the scope of this post but if you are not familiar with them, check out some of our other posts.
AWS Service: Cognito
Purpose: As described above, and as the focus of this post, we will use Cognito to broker identity with our customer’s identity providers. These can be any SAML provider such as Google GSuite, Microsoft Active Directory, Oracle’s Ping Identity or any other SAML provider out there.
AWS Service: AWS SSM
Purpose: Systems Manager will act as a configuration store but technically you can use any nonvolatile store to save the information we will cover in this post.
Overall Architecture
At a high level our Service Architecture looks like this:
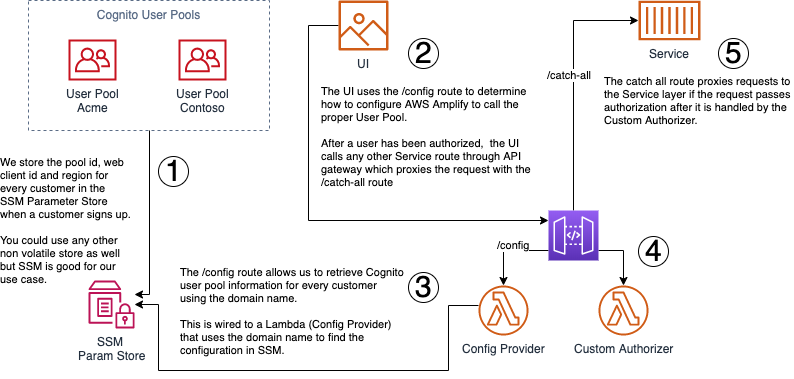
Ok, now we are ready to roll so let’s break the process down (with each tag number X in the diagram being represented by “Step X” below).
Step 1: Handling Identity Resolution
We create a unique Cognito pool for each customer and then configure the pool to talk to our customer’s enterprise directory through SAML federation.
Using separate pools per customer allows us to handle identity resolution for each customer; however, we need a way to know which user pool to authenticate each user against.
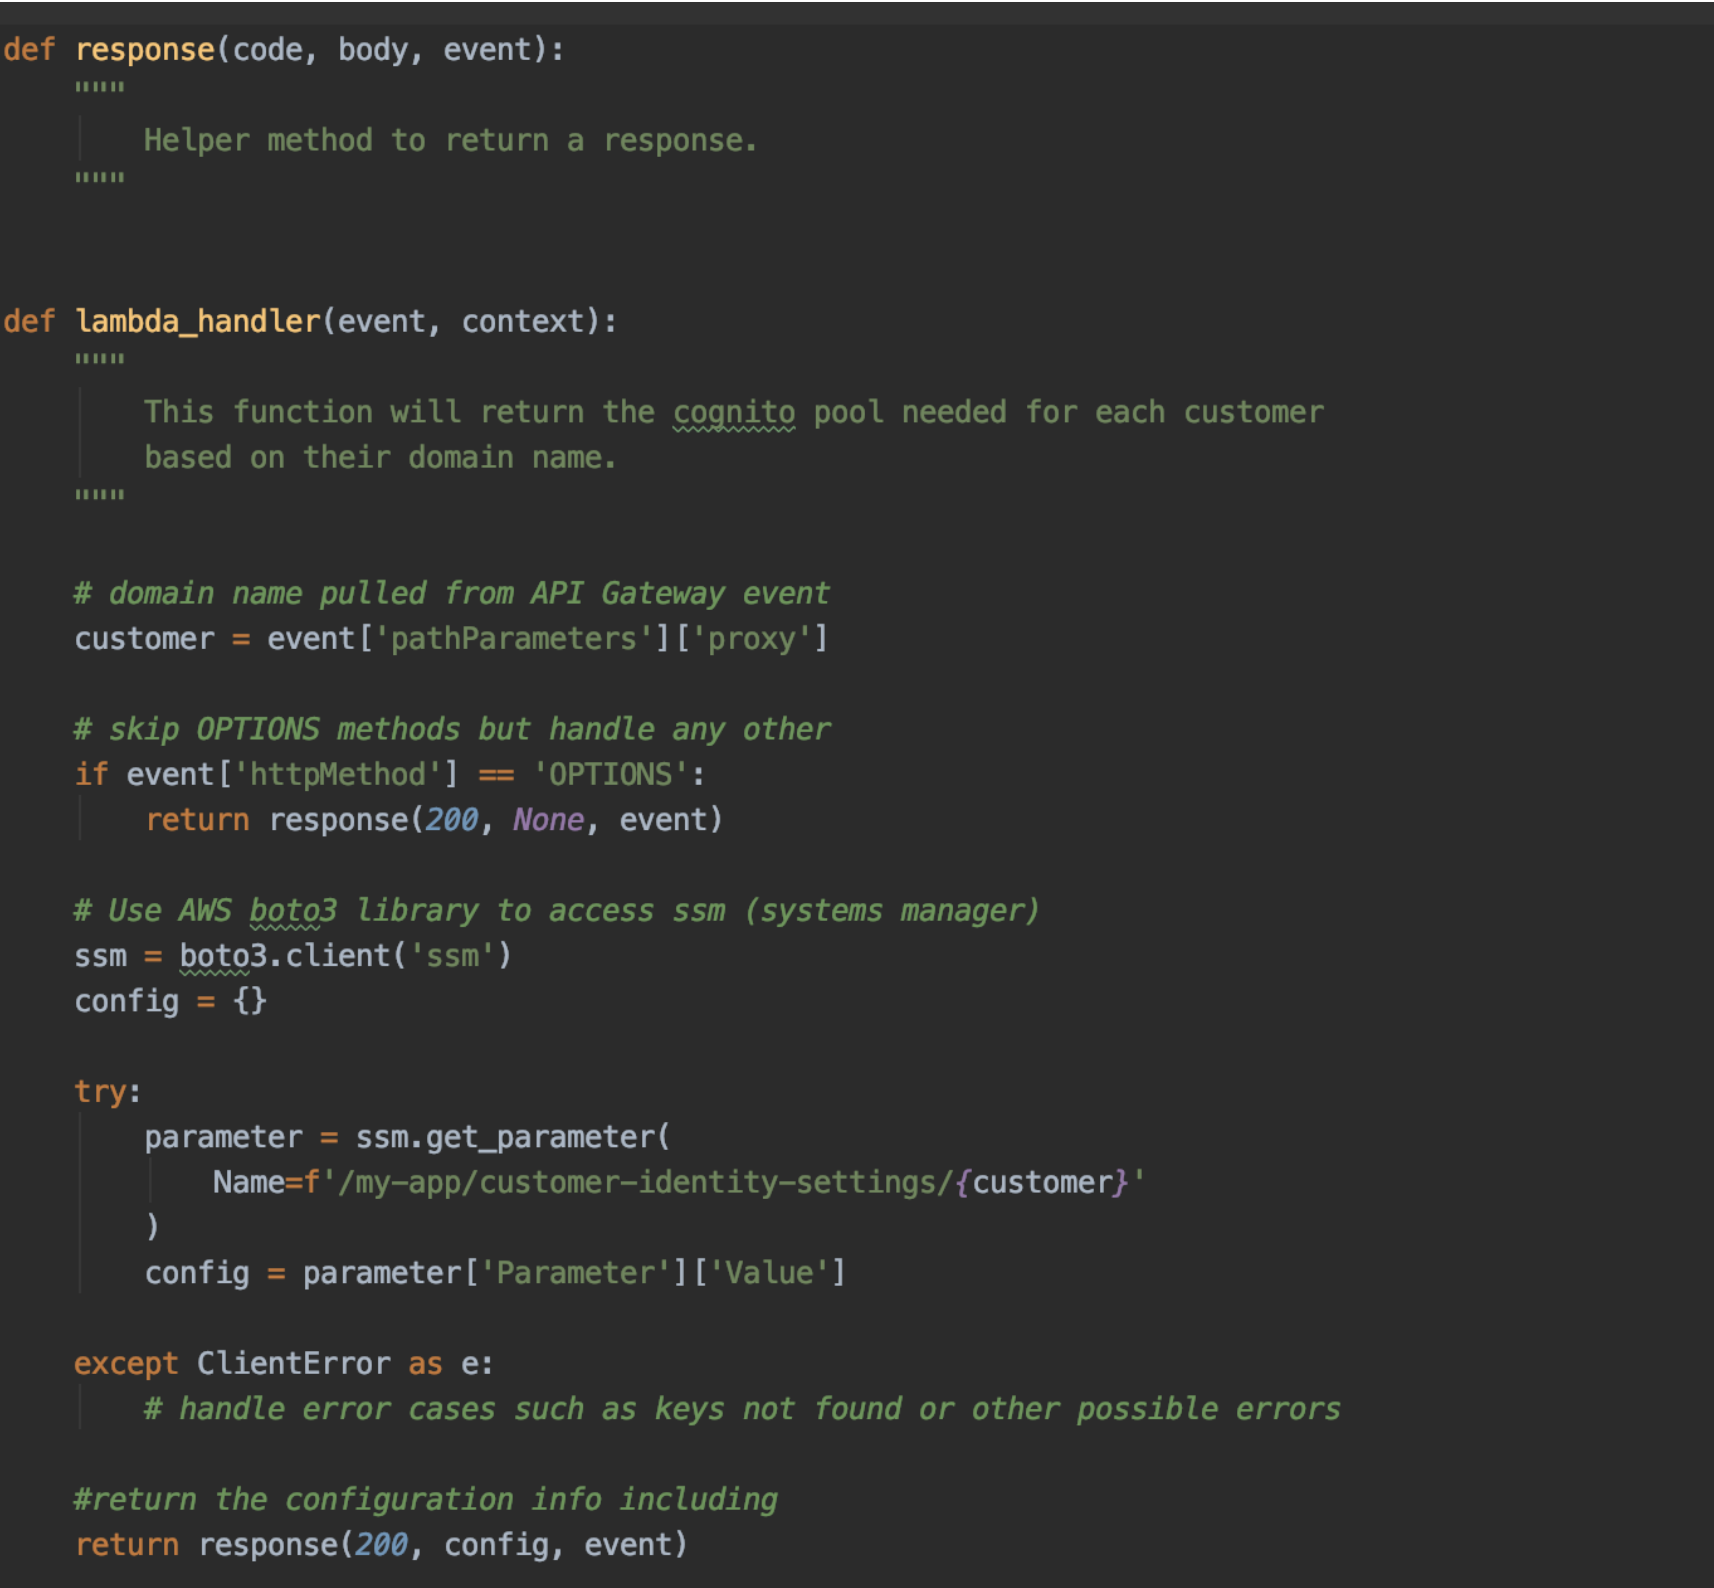
We will cover more on how to resolve that but for now, we will just store each user pool id and app client id generated by Cognito for each user pool in SSM under a path like this:
/my-app/customer-identity-settings/{customer}We plan to use this info in our next steps to challenge the user for their enterprise credentials
Step 2: Challenging for Auth
AWS provides several SDKs to handle authentication in your applications. For the purpose of this post I will leave those details out of this but the important thing to know, is that regardless of which toolkit you decide to use, you will need to know 2 to 3 things from each pool so you can authenticate against them:
-
The region where the pool is created in
-
The pool id
-
The client application id
We recommend you check out the AWS Amplify framework to help with building your app if you are integrating with AWS services but in particular, the authentication flows are helpful for this tutorial.
Keeping the above in mind, how can we get this information for each customer on the fly?
Step 3: Determining Customer Pools
We can take advantage of the fact that we are creating a unique domain name per customer for example:
https://acme.my-app.com or https://contoso.my-app.com
Using the domain name and a simple Lambda function we can resolve the user pool that we need to use per customer in order to configure Amplify to challenge for authentication.At a high level it will look like this:
-
Using API Gateway, we will expose a config route to return our Auth configuration
-
This route will trigger a basic Lambda function responsible for finding the configuration in SSM
-
The function will use the domain name to look up the information in SSM and return it to the UI
-
The UI will use the retrieved information to determine which pool to use per customer
-
Finally, we will use a custom authorizer in API Gateway to offload authorization from the service layer.
Sample Lambda to Resolve Cognito Information
Step 4: Offloading Authorization
One of the benefits of API Gateway is that it allows us to offload authorization from downstream processes so that each of our micro-service can focus on its dedicated business logic.
For this step, we will take advantage of the quick start repository provided by the AWS team to build a Custom Authorizer. To summarize what is happening here, the authorizer does the following:
-
Retrieves the authorization token from the event
-
Parses out the claims to get the issuer
-
Retrieves the issuer’s public keys and uses them to validate the token
-
If validation fails, returns a not authorized exception
-
Otherwise, return a policy that grants access to all methods
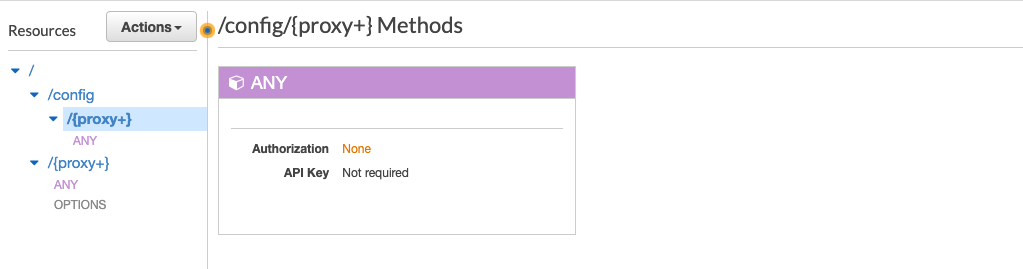
Step 5: Configuring API Gateway as a Service Proxy
We will cover building serverless APIs using API Gateway on another post but for now you can see from the below illustration that we’ve configured our API to have 2 routes:
-
a /config route that doesn’t enforce authentication
-
and a catch-all route that will proxy over any other requests to our service layer which uses our customer authorizer.

Conclusion
In this tutorial, you learned how to devise a flow to provide enterprise sign-in capabilities for your multi-tenant applications using Cognito and a few other supporting AWS Services.
In a future post, we will cover how to leverage Cognito to allow your support teams to log in as one of your customers’ accounts to help troubleshoot potential issues.
Hope this was helpful and looking forward to hearing your thoughts. Also, don’t hesitate to let us know if you would like us to cover other topics in the future!