


Jedediah Ecker February 27, 2023
In our previous article, “API Debugging with Capture Proxies”, we explored what a capture proxy was, and how it can be an incredibly useful tool for developers. We discussed the basics of how these tools operate, and showed several examples of different capture proxy tools, to demonstrate how they can be targeted for different use cases.
In this tutorial, we’ll walk through configuring a capture proxy and using some basic features.
There are two steps to configuring an application to use a capture proxy.
(1) Tell it to use the proxy
(2) Tell it to trust the proxy’s Certificate Authority (CA)
While this may sound straightforward, setup can vary between languages, libraries, operating systems, and even web browsers. To avoid these kinds of differences, we’re going to use mitmproxy’s terminal UI in a docker image.
Using a Capture Proxy in Docker
First, install Docker if you haven’t already.
In a terminal window, pull and launch an ubuntu image like so:
docker pull ubuntu:20.04
docker run --rm -it -p 8888:8888 ubuntu:20.04
You’ll now be running in a clean, isolated instance of ubuntu.
From here, let’s install a few dependencies we’ll need.
apt update
apt-get install nano curl tmux python3 python3-venv pip

pip install mitmproxy
We’ve installed tmux so we can manage mitmproxy in one virtual terminal, and work with curl or code in the other.
First simple run ‘tmux’. Hit “ctrl + b” (or “cmd + b” on Mac), release the keys, then hit `”`. This opens a new “window” within the terminal. You can switch between windows by hitting “ctrl + b” again, and using the up or down arrow keys.
In the top window which we’ll use for the proxy, launch mitmproxy:
mitmproxy --set console_palette=lowdark -p 8888In the bottom window which we’ll use to run console commands, let’s start with a non-encrypted HTTP call, to keep things simple.
run:
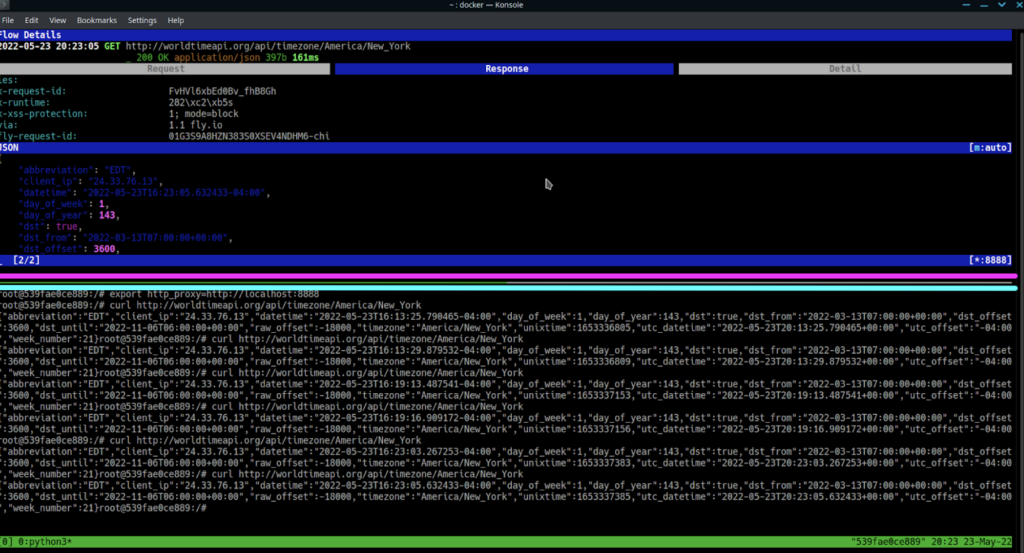
export http_proxy=http://localhost:8888

curl http://worldtimeapi.org/api/timezone/America/New_York
Hit “up” on the keyboard and enter a couple of times, to repeat the curl command and populate more data.
You should now have a view like this, where mitmproxy is the top window, and the bottom window is used for general console actions:
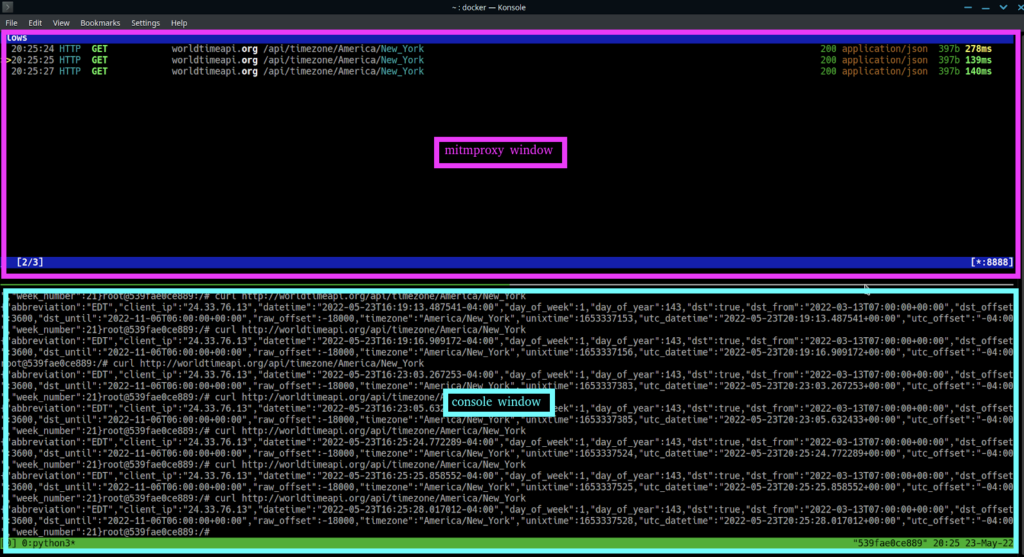
Switch to the mitmproxy window (indicated with hot-pink in the screenshot), and use the up and down keys to select a request. Hit “e” on a request to be prompted to save a request externally, or hit “enter”, and you’ll be able to view more details.
From the detailed view, hit the left or right arrows to cycle through the different detailed tab views, and use the up and down arrows to scroll through the data.
If you hit “r” at any time in this view, you’ll see the times refresh, as this will replay the request.
If you hit “e” while on the request tab, you’ll be prompted to select an item to edit. Select “url” with the arrow keys and hit “enter”.
You’ll now see the path available for editing in nano, still in the mitmproxy window.
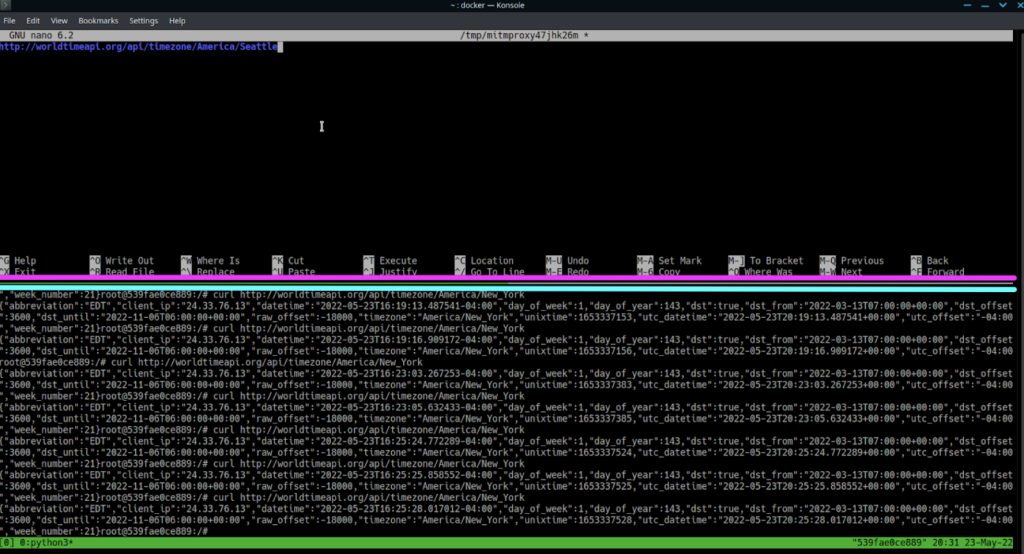
Change this to a city that isn’t a well-known timezone name, save it, then hit “r” to play it.
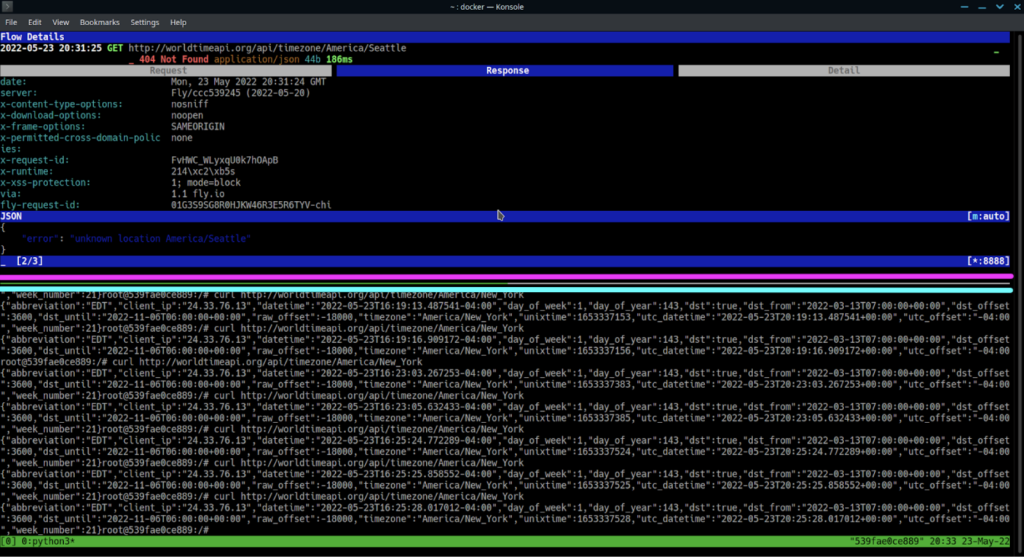
Hit “q” to return to the list view.
Now that you have a feel for how to use mitmproxy, let’s try this same thing with an HTTPS url. After all, just capturing unencrypted data really misses the point here.
First, switch to the console window, indicated with light blue in the screenshots. Run the following, while noting that the env variable is now https_proxy, and we are hitting an HTTPS endpoint in curl:
export https_proxy=http://localhost:8888
curl https://worldtimeapi.org/api/timezone/America/New_York
You should now have an error that looks something like the following:
curl failed to verify the legitimacy of the server and therefore could not establish a secure connection to it. To learn more about this situation and how to fix it, please visit the web page mentioned above.Great! You’re seeing man-in-the-middle attack prevention in action. Now to use this tool to its fullest, you’ll learn how to get around it.
You need to install the mitmproxy certificate authority as a root CA on this linux system. You can run the following commands to do this (the file extensions you use matter for this process):
mkdir /usr/local/share/ca-certificates/extra

cp ~/.mitmproxy/mitmproxy-ca-cert.cer /usr/local/share/ca-certificates/extra/mitmproxy-ca-cert.crt

update-ca-certificates --fresh
Alright! Ubuntu itself now trusts the CA cert. Let’s run the command again:
curl https://worldtimeapi.org/api/timezone/America/New_YorkWell done! You just acted as a man-in-the-middle for your own system, and read encrypted traffic!
Curl is all well and good, but let’s do one more example using Python code.
First, create and activate a Python “virtual environment”. A Python virtual environment is a way to isolate dependencies between scripts. It avoids conflicts and helps ensure your setup is reproducible.
The following creates an environment named “env”, and makes it the active environment.
python3 -m venv env
source env/bin/activate
Next, install the requests module, which your code will need:
pip install requestsCreate a file called “request.py”:
nano request.pyGive it the following contexts:
import requests

result = requests.get('https://worldtimeapi.org/api/timezone/America/New_York')

print(result.content)
Now run the file:
python3 request.pyAnd… it failed! Why is that?
Well, just because the OS trusts the CA by default, doesn’t mean that any given application or library checks with the CAs on the OS. Many of them manage their own trust. It just depends on the runtime.
How do we get Python to work, then? Well, it’s pretty simple on Linux. Just set an environment variable that tells Python to use the system ca store, and then try again:
export REQUESTS_CA_BUNDLE=/etc/ssl/certs/ca-certificates.crt
python3 request.py
Great! The request went through, and you can see it displayed in mitmproxy!
Mitmproxy has more features than just viewing and replaying traffic, but those go beyond the scope of this tutorial. To learn more, check out their website.
Configuring Firefox to use a Capture Proxy
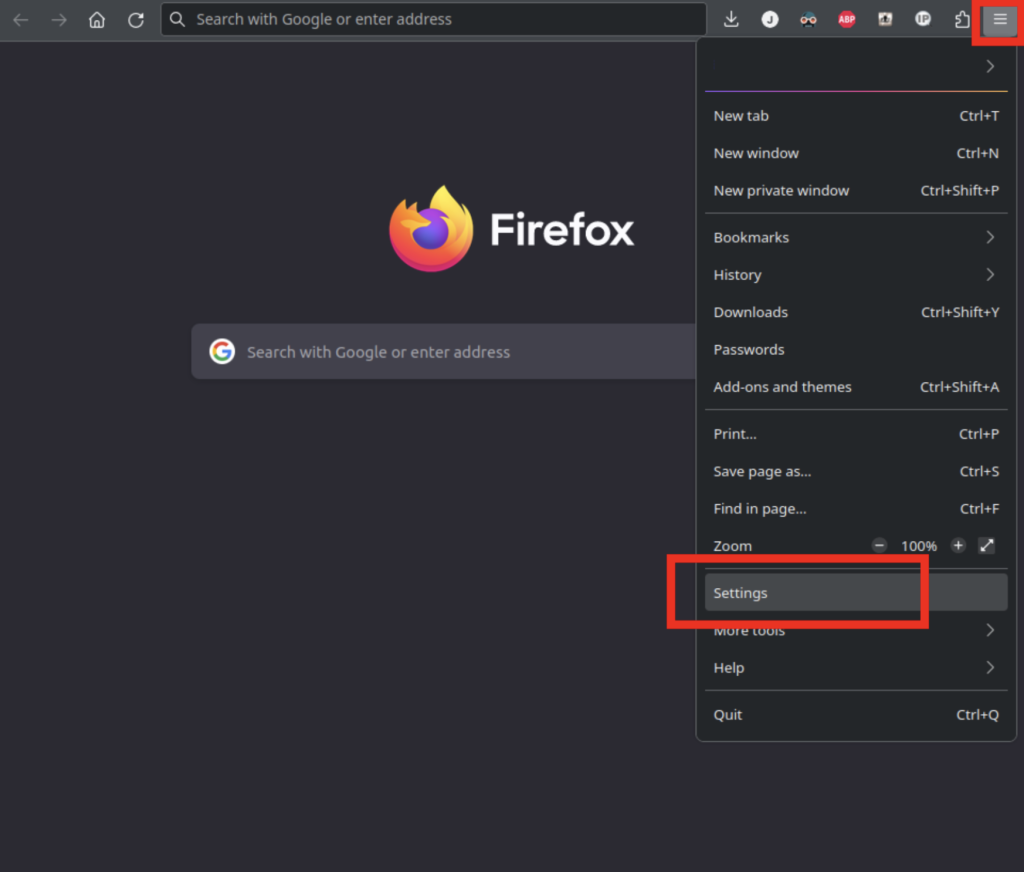
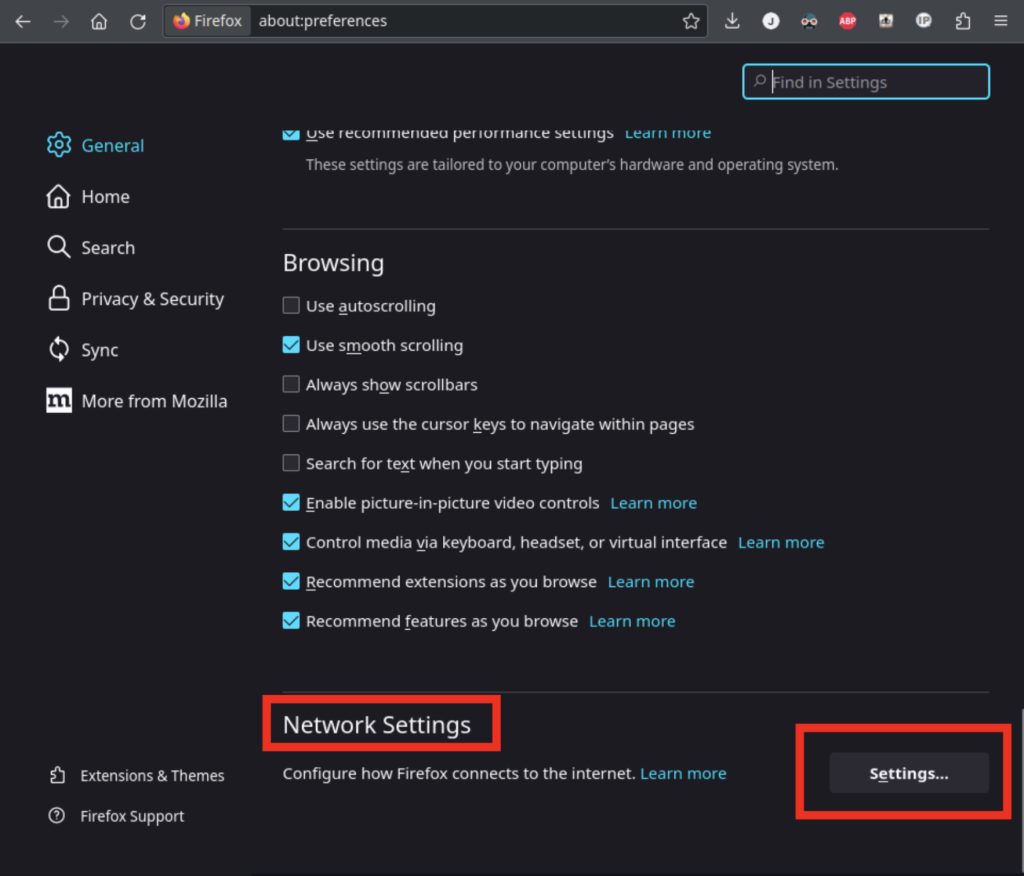
Let’s say you want to configure a web browser to use a capture proxy. First, you’ll need to navigate to the proxy settings. In Firefox, open the hamburger menu, and under settings, scroll down to “Network Settings”.
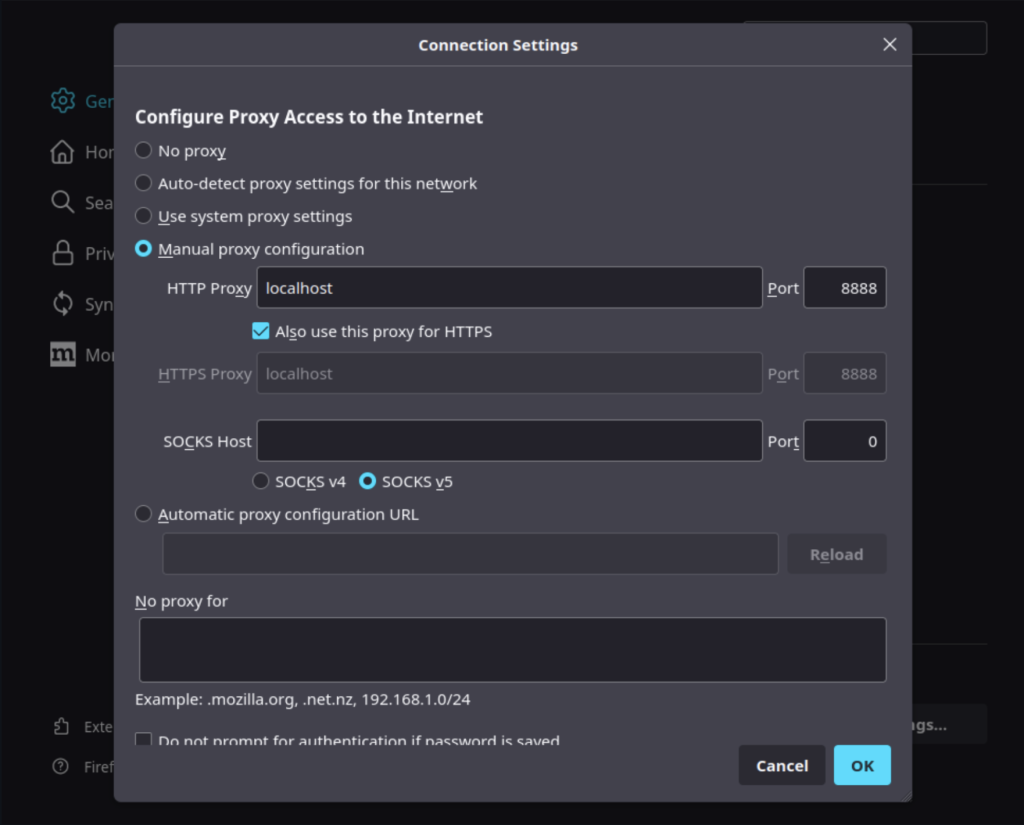
Before doing this next step, be aware that if mitmproxy isn’t running, or if your configuration is incorrect, Firefox won’t be able to access the internet. You can recover access to the internet by switching this back to “no proxy”.
From here, select “Manual proxy configuration. Enter “localhost” in the address, and “8888” in the port, for both your HTTP and HTTPS proxies.
After you’ve saved the proxy settings, if you try to navigate to a website like Google, you’ll get a security warning. This is because Firefox does not trust the mitmproxy Certificate Authority. Until you update Firefox to trust it, you won’t be able to access any encrypted websites without disabling the proxy.
To allow Firefox to trust mitmproxy, first navigate to https://mitm.it/. Your local copy of mitmproxy is hosting this site. You should see a page allowing you to download your specific mitmproxy CA certificate. You’ll want to follow the instructions to import it.
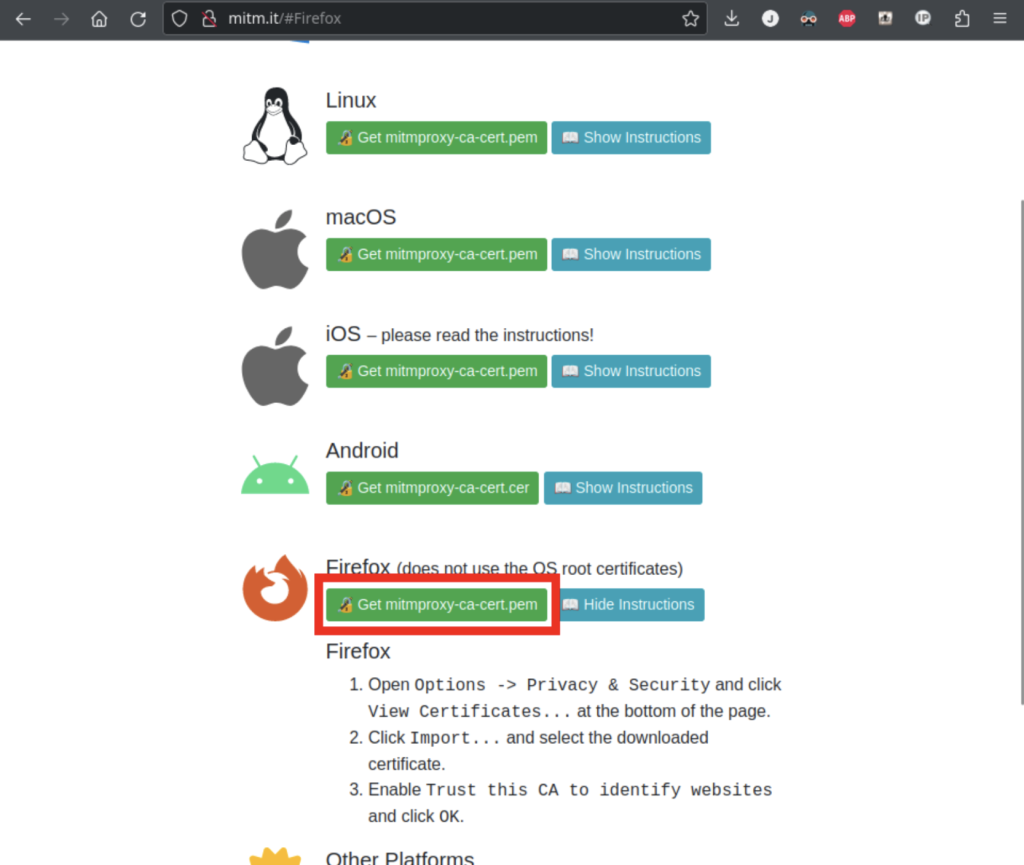
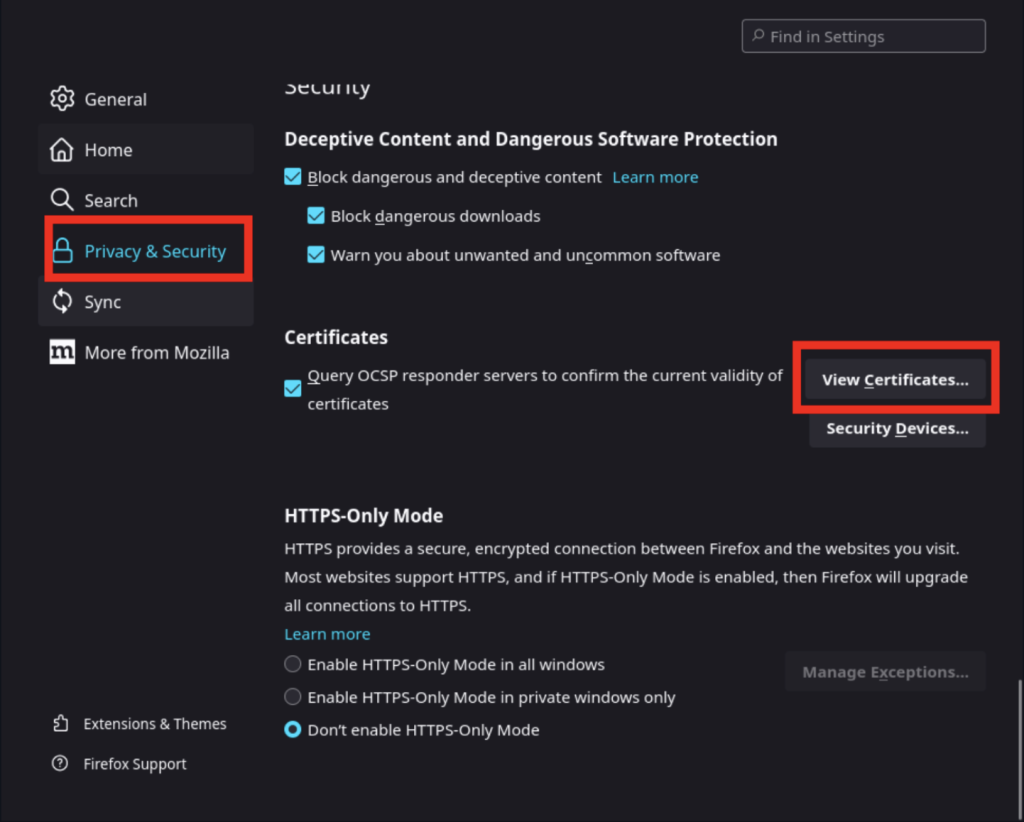
As the website instructs, download the pem file, and then navigate to your Privacy and Security settings:
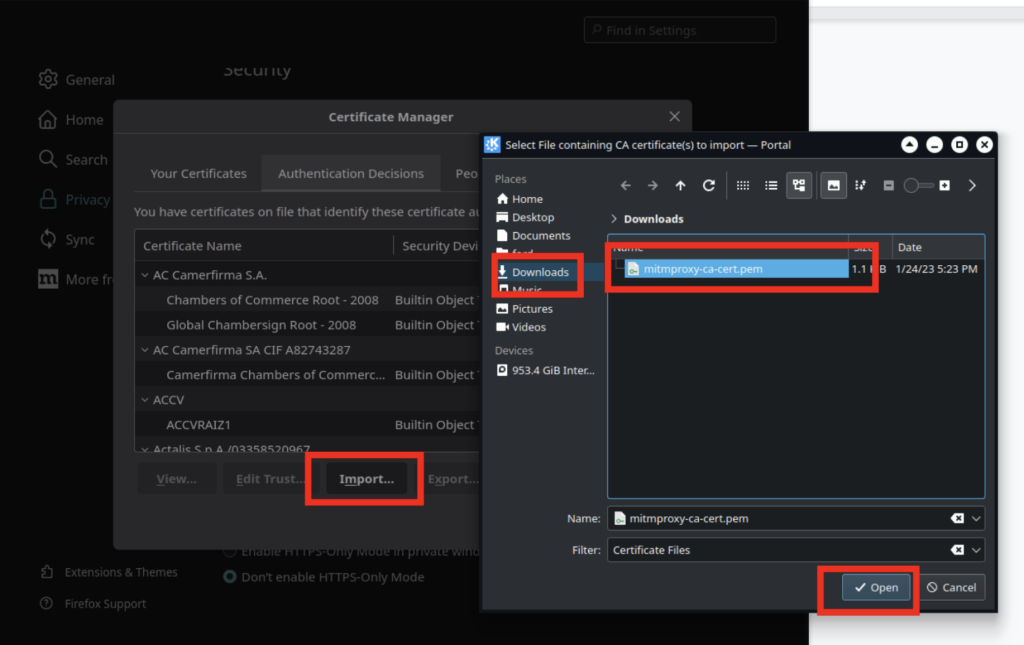
Use the import button to select the certificate you downloaded:
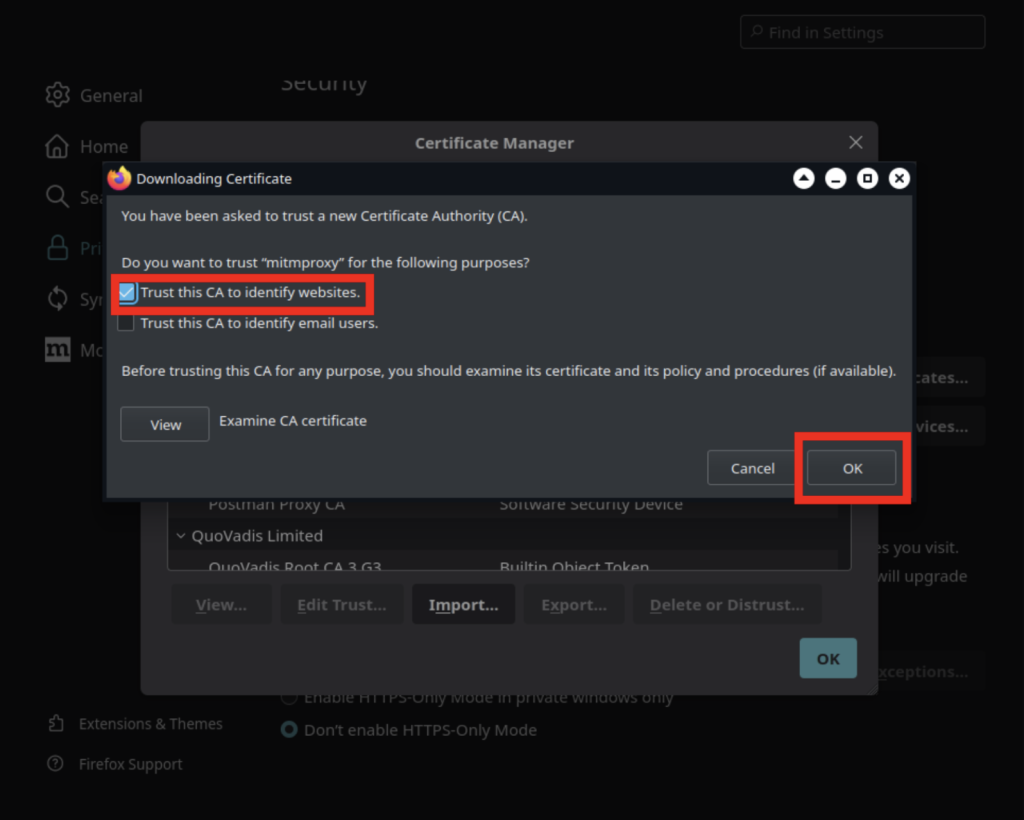
Make sure you check the button that says “Trust this CA to identify websites”, and you should be good!
From here, navigate to Google, do a search, and you should see a ton of traffic captured! Once again, remember to disable the proxy settings in Firefox whenever you shutdown mitmproxy.
Networks That Already Require Proxies
In a corporate environment, you may find that you already need to use a proxy in your day-to-day work.
This doesn’t mean you can’t use a capture proxy tool. Many capture proxy tools can be configured to route all requests through a secondary proxy. Mitmproxy calls this feature an “upstream mode”. You can do this by starting mitmproxy with these parameters:
mitmproxy -p 8888 --mode upstream:http://[PROXY IP/DOMAIN]:[PROXY PORT]Using a Reverse-Capture Proxy
Let’s say you’re in a situation where you’re developing an application, and it’s easy for you to change the url your app uses for an api, but you’re really struggling to get your runtime to pick up your proxy settings.
If you find yourself in this situation, you can work around it by running mitmproxy in “reverse proxy mode”. This allows you to target your application at a localhost url and get the capabilities of a generic capture proxy.
First start mitmproxy like this:
mitmproxy -p 9999 --mode reverse:https://worldtimeapi.orgNext, issue a curl command like this:
curl http://localhost:9999/api/timezone/America/New_YorkLook at that! It’s a little less powerful than configuring things as a full proxy, but it’s a pretty easy work-around.
Summary
As we explored in the previous article, capture proxies are feature-rich tools that can accelerate development and aid in debugging. While configuring them is just 2 steps (use the proxy and trust the Certificate Authority), that configuration can be tricky.
The process of trusting a certificate authority varies between operating systems. Not all software will trust a CA certificate, just because the operating system trusts it. You may need to look up specific steps for your given runtime.
Additionally, not every language can be configured to use proxies in the same way. Some runtimes are configured with a fairly standard set of environment variables. Others will honor system proxy settings, which are often configured under wifi settings. Java uses its own system for configuring proxies, but there are individual HTTP libraries that don’t follow the standard.
We’ve gone over a couple of ways to integrate with a capture proxy, but there are more methods available than we’ve covered in this article. To get an idea of what is possible, see the mitmproxy documentation on the topic.
You may go through a small struggle the first time you configure a capture proxy for a new runtime. That said, the visibility and insight you’ll gain can easily save you time in the long run.