

Fast-Track Your Dialogflow Virtual Agents with Auto-Generation
Fast-Track Your Dialogflow Virtual Agents with Auto-Generation

Alberto Antenangeli
Alberto Antenangeli May 1, 2023
In a recent blog post, we explored how AI can help accelerate call center automation using a design pattern for FAQ-style Dialogflow Agents. Let’s say you’ve taken the leap and created your team of virtual agents. Now you need practical techniques to efficiently manage them and rapidly create new ones. And what’s more practical than a spreadsheet?
In this new post in the series, we’ll walk through how to auto-generate FAQ-style AI agents in a way that makes them much easier to maintain and rapidly deliver with minimal effort.
How Does a Spreadsheet Become a Virtual Agent?
At a high level, it’s pretty simple: you create your FAQs in a spreadsheet, and then you use that input to auto-generate a new FAQ-style virtual agent. As the saying goes:
“Choose a lazy person to do a hard job. Because a lazy person will find an easy way to do it.”
Auto-generation certainly seems like the easy way to rapidly prototype and build new FAQ agents. Of course, in practice it’s a little more complex. Details are important, so keep reading to learn about how we solved this problem.
Let’s start from the beginning. If you’re like most call center optimization teams, you’re probably collaborating on the FAQs your virtual agent needs to answer. You’re trying to categorize your questions, come up with a list of training phrases, and how the agent should respond. Things are fluid and changing rapidly, and chances are you’re using some sort of spreadsheet solution to keep track of everything. Spreadsheets are convenient, universally understood, and make it easy to visualize, filter, sort, and share information.
Getting the FAQs into your spreadsheet is the first part. Understanding how that training material fits into your FAQ-style Agent structure in Dialogflow is the next.
As described in our previous blog post, the general idea is to use a Route Group to capture the user Intent in a parameter, and then use it to route the Agent to the appropriate Page that will process that particular question. This approach allows us to group Pages that process closely related Intents together in a Subflow, thus creating a more structured, easier-to-maintain Agent.
As a reference, this is what the Agent structure looks like:

This works because FAQ-style Agents can follow a well-defined structure, as shown above.
Wherever there is a common, repeatable pattern, you should ask yourself whether that pattern can be automatically generated. This is precisely the case for our FAQ Agent above, and this is the subject of this article.
Why Code Generation?
When you are working on FAQs, your focus is likely on the questions callers may have, the Training Phrases for the Intents associated with those questions, and the answers you would like to provide. Particularly during the early stages of development, quickly making changes to those Intents and training phrases, and then testing the Agent, is key: this gives you the necessary agility to prototype, change, and refine.
If you go back to the agent design pattern, you will see that each question has the following components:
- An Intent.
- An optional Fulfillment message.
- The Agent’s response.
Moreover, the messages are grouped together based on their category.
In the early stages of analysis, your focus when developing the FAQ Agent can likely be expressed like this simple example:
| Category | Intent | Training Phrases | Fulfillment | Response |
| Flight Info | Flight Status | Is flight 123 to NYC late? What is the status of flight 123 to NYC? | Let me check the status of your flight for you | Your flight is 30 minutes late. |
| Flight Info | Departure Time | What is the departure time of flight 123 out of Houston? Departure time for flight 123 from Houston. | Let me check the departure time of your flight | Your flight is now scheduled to depart at 3:30pm. |
| Luggage | Weight | What is the maximum allowed weight for checked baggage? How heavy can my checked bags be? | The maximum allowed weight for checked baggage is 50lb per bag. | |
| Luggage | Carry-on | What are the allowed dimensions for carry-on luggage? How big can my carry-on luggage be? | Carry-on luggage cannot exceed the following dimensions: 9in x 14in x 22in. | |
| Freq Flyer | Password | I need to reset my frequent flier password. My password doesn’t work. | You can reset your password online by visiting www.acmeair.com/account. | |
| Freq Flyer | Balance | What is my frequent flier miles balance? How many miles do I have in my account? | Please wait while I retrieve your balance | Your balance as of today is 45,000 miles. |
Although the spreadsheet gives you the flexibility to work as a team, with the convenience of being able to add, remove, or change the intents and phrases, it has a major shortcoming: it does not let you test the training phrases or experiment with what a real interaction with the Agent feels like. One option is to have people manually create a prototype Agent and keep it up with the changes from the spreadsheet. But this is where we should find an easy way to do it – have something that takes the spreadsheet as input, and generates a working Agent as the output.
Virtual Agent Directory Structure
Let’s try an exercise.
Create a simple FAQ agent and export it to JSON, download it locally, and expand the resulting zip file. You will see the following directory structure:
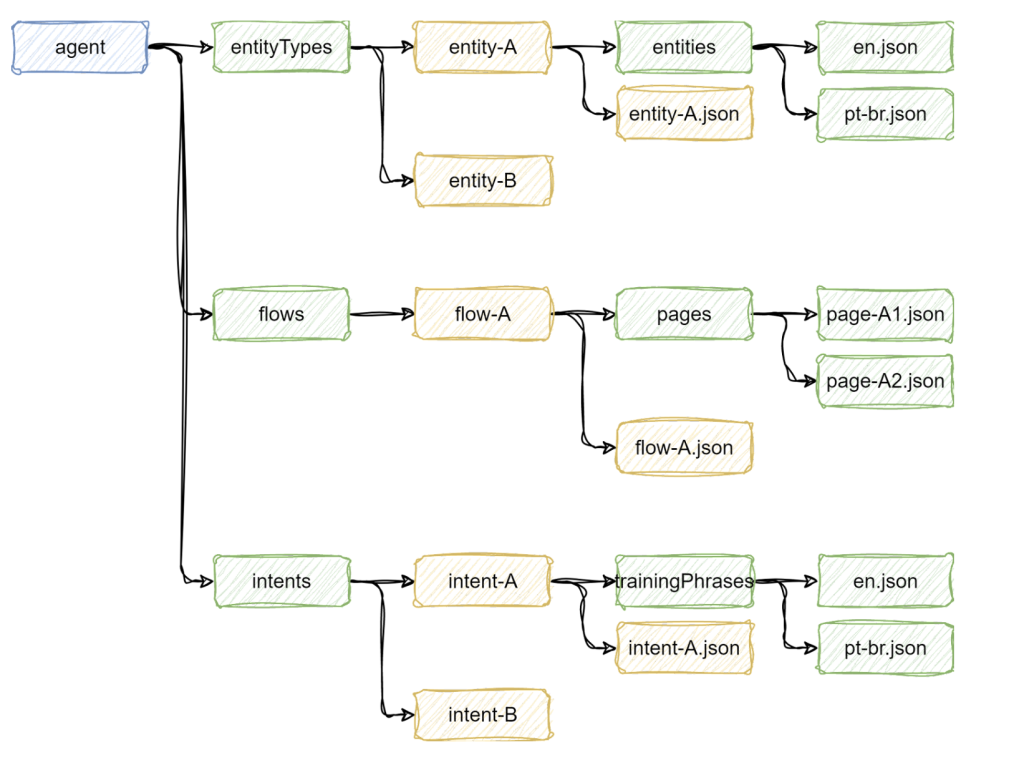
The actual contents depend on how your Agent is configured, but the main idea is that the directory structure is fairly simple:
- The green boxes contain fixed names. They are always the same, regardless of how the Agent is configured.
- The yellow boxes contain names that reflect the object to which they refer. For example, an Entity called
ssnwill have a matchingssndirectory, and a matchingssn.jsonfile under it. Similarly, an Intent calledflight-statuswill have a matchingflight-statusdirectory, and aflight-status.jsonfile under it.
As expected, the contents of all JSON files also follow a well-defined structure. For example, the en.json file containing Training Phrases looks like this:
![trainingPhrases: [
{
parts: [
{
text: ...
}
{
text: ...
}
]
repeatCount: 1
languageCode: en
}
{
parts: ...
}
...
]](https://s44407.pcdn.co/wp-content/uploads/2023/05/Screen-Shot-2023-05-01-at-9.41.56-AM-1024x702.png)
In other words, trainingPhrases is an array of parts, and parts are arrays of texts, which may have a single element (when there are no entities embedded in the text) or multiple elements alternating simple texts and references to the Entities.
Other files are quite simple. Here is the Default Welcome Intent and the Default Negative Intent:
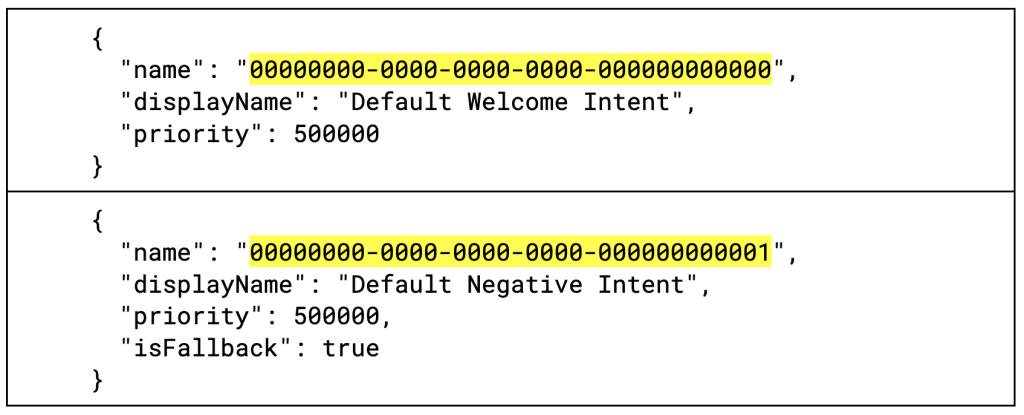
In fact, the Default Welcome Intent and the Default Negative Intent are special cases, and they should always be part of the Agent with the names highlighted above. Note that name is a UUID, and the displayName is what you see when using the Dialogflow GUI.
For the purposes of this article, we will not explain the structure of each JSON file; for a complete description of the exported Agent format, visit Google’s documentation. However, we strongly encourage you to pause to look at an exported agent JSON to familiarize yourself with the structure before you continue. The key point is: no matter how complex your Agent is, the directory structure remains the same.
It is easy to see how a spreadsheet like the one above has a pattern, and how that pattern translates to the Agent’s directory structure and file contents. This is true not only for FAQ-style Agents, but any Agent that has repeatable patterns, making them great candidates for code generation.
Generating the Virtual Agent
The Agent’s files usually fall into two categories:
- Static: files that do not change, like the default Intents above. Those can be directly extracted from the Agent export.
- Dynamic: files whose names, contents, or both change depending on the input. For example, when generating Intents from our simple spreadsheet above, file and directory names should match their corresponding cells in the spreadsheet.
Let’s now look at the steps required to generate the Agent based on data from a Spreadsheet.
Creating and Populating the Directory Structure
Let’s start by creating a few directories:
- A static configuration directory containing the static files, whose directory structure follows the Agent directory structure as shown above.
- A dynamic configuration directory, which will be used to drive the generation of the dynamic contents.
- A target directory, which will contain the final Agent, with all directories and files.
The first step in our process is pretty straightforward: recursively copy all contents from the static configuration directory to the target directory.
Before we jump into the dynamic content generation, we should convert the spreadsheet above to something more structured:
Flow::fulfillment associates en to <some English message>, pt-br to <corresponding Brazilian Portuguese translation>, etc.)Generating Intents
Let’s look at Intents: they all go under the intents directory, with each Intent having a subdirectory matching its name; under it, there is a trainingPhrases directory.
Creating those subdirectories in our target should be simple. All we need to do is to traverse the Agent::intents list and use the intent’s displayName to create them.
Next we need to generate the JSON file contents. If you are working in the JVM platform, there are several tools that handle the generation of templatized files. For example, Freemarker allows you to combine text files with directives that map to data in your application to drive the contents of the output. In other words, templates + data = output.
Let’s look at a sample Intent training language file:
![{
"trainingPhrases": [
{
"id": "ffde02e2-98a2-4b62-b1bc-bd7187301547",
"parts": [
{
"text": "What is the maximum allowed weight for checked baggage?",
"auto": true
}
],
"repeatCount": 1,
"languageCode": "en"
},
{
// Similar entries for pt-br
}
{
"id": "be4124e4-135d-402f-85e4-ca677925eb3c",
"parts": [
{
"text": "How heavy can my checked bags be?",
"auto": true
}
],
"repeatCount": 1,
"languageCode": "en"
},
{
// Similar entries for pt-br
}
]
}](https://s44407.pcdn.co/wp-content/uploads/2023/05/Screen-Shot-2023-05-01-at-9.47.17-AM-960x1024.png)
As you can see, there are two nested lists:
- The outer trainingPhrases list
- The nested parts list
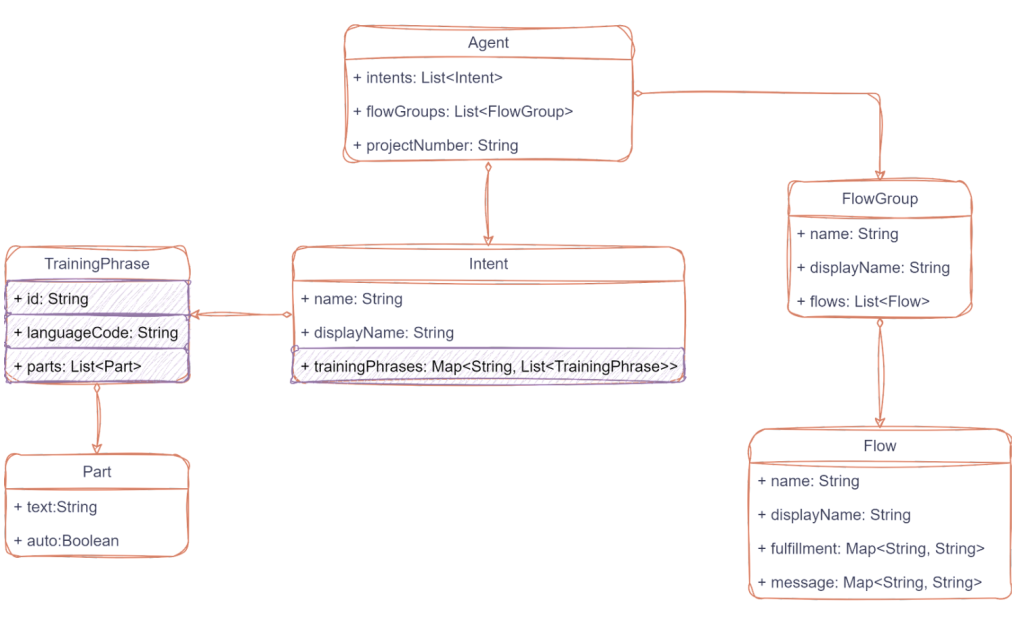
If you look at our class model above, Intent has a list of trainingPhrases for each language, and TrainingPhrases has a list of Parts. Without further ado, here is a Freemarker template file that generates the file above based on our object model:
![{
"trainingPhrases": [
<#list trainingPhrases as key, trainingPhraseList>
<#list trainingPhraseList as trainingPhrase>
{
"id": "${trainingPhrase.id}",
"parts": [
<#list trainingPhrase.parts as part>
{
"text": "${part.text}",
"auto": ${part.auto?c}
}<#sep>,</#list>
],
"repeatCount": ${trainingPhrase.repeatCount},
"languageCode": "${trainingPhrase.languageCode}"
}<#sep>,
</#list></#list>
]
}](https://s44407.pcdn.co/wp-content/uploads/2023/05/Screen-Shot-2023-05-01-at-9.47.52-AM-1024x644.png)
We highlighted a few elements to make it easier to match with the original file, and you should be able to relate the markup references above to our data model (those are highlighted in lavender – both here and in the class diagram above).
Generating the <flow-name>.json File
These can be generated following the same approach. If you are following the design described above, those files will look something like this:
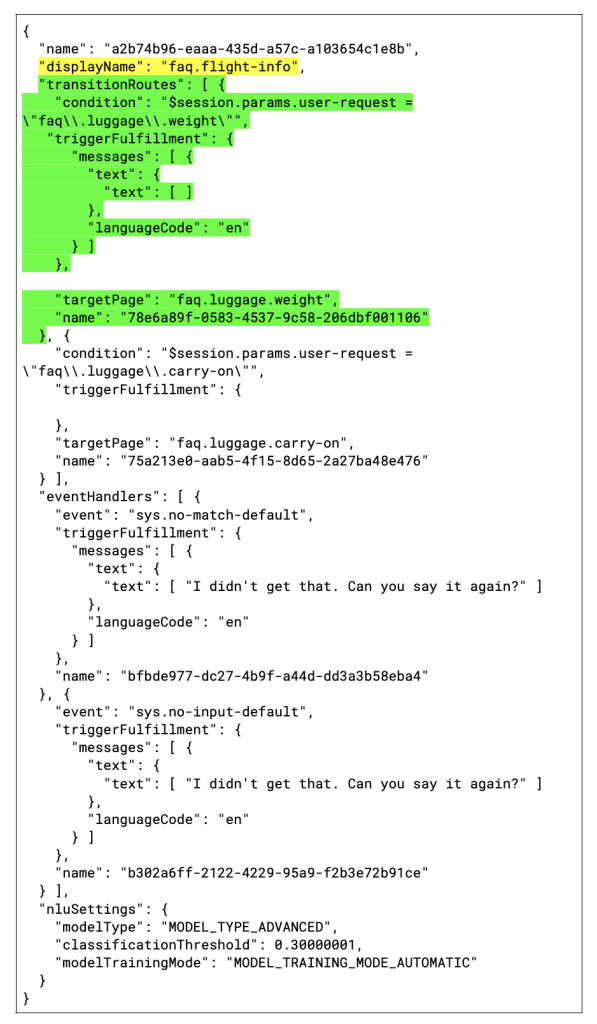
We have highlighted the two important elements that need to be code generated:
- The flow
displayName, which should also match the names of the directory under the flow directory and the name of the JSON file. This name is derived from the category column from the input spreadsheet – “Luggage” becomes “faq.luggage”. The name attribute is simply the string representation of a UUID. - The
transitionRoutes, for which we highlighted one of them. As per our Agent design, intent detection and routing is handled by another flow, which sets auser-requestsession parameter with the name of the page that contains the fulfillment message for each intent. Note that the name of the page is derived from the spreadsheet category and intent columns: “Luggage” and “Weight” are combined to generate a standard page name,faq.luggage.weight.
The rest of the page is boilerplate. Here is a snippet of the Freemarker template that creates this page:
![{
"name": "${name}",
"displayName": "${displayName}",
"transitionRoutes": [
<#list flows as flow>
{
"condition": "$session.params.user-request = \"${flow.displayName}\"",
"triggerFulfillment": {
"messages": [ {
"text": {
"text": [ "${flow.message.en}" ]
},
"languageCode": "en"
} ]
},
"targetPage": "${flow.displayName}",
"name": "${flow.name}"
}<#sep>,
</#list>
],
… Boilerplate part
}](https://s44407.pcdn.co/wp-content/uploads/2023/05/Screen-Shot-2023-05-01-at-9.54.48-AM-1024x770.png)
Like the previous example, we have highlighted the relevant parts of the template that match the JSON file.
Generating the <page-name>.json File
Each flow has a pages subdirectory containing its pages, one per file. This is what those files look like:
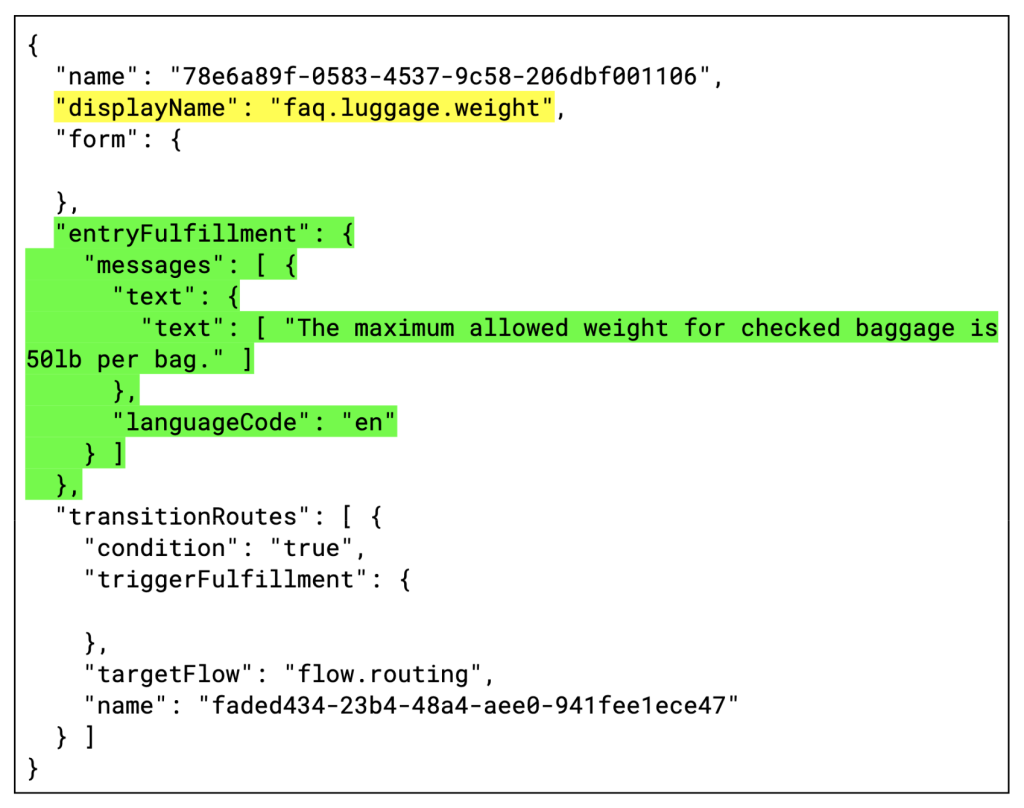
And the Freemarker template:
![{
"name": "${name}",
"displayName": "${displayName}",
"form": {
},
"entryFulfillment": {
"messages": [ {
"text": {
"text": [ "${fulfillment.en}" ]
},
"languageCode": "en"
} ]
},
"transitionRoutes": {
"condition": true,
"triggerFulfillment": {
}
"targetFlow": "flow.routing",
"name": "faded434-23b4-48a4-aee0-941fee1ece47"
}
}](https://s44407.pcdn.co/wp-content/uploads/2023/05/Screen-Shot-2023-05-01-at-9.56.12-AM-1024x773.png)
Of course, in a real scenario the actual weight may come from a webhook call that checks a frequent miles program status or other information, but this can be easily incorporated later on.
Create the Agent Zip File
At this point, all files required by the Agent have been generated. The third and final step in the process is simple: zip the target directory and upload it directly to Dialogflow. And that’s it! Your Agent is ready for use. Even with a large number of entries, the whole process should take only a couple of minutes.
Parting Thoughts
This may seem somewhat intimidating at a first glance. But once you familiarize yourself with the directory and JSON file structure by creating and exporting a simple Agent, you will see that it’s not that complicated, and it pays off in the long run. Here’s how:
- You can quickly prototype and test Intents, Training Phrases, and messages.
- Because the Agent is generated, you can enforce naming conventions, structure, etc.
- Once the questions, Intents, Training Phrases, and responses stabilize, you can use the generated Agent as a starting point, and tweak it to cover more complex use cases. This will help reduce initial development time.
The key point is that no matter how complex your Agent is, this complexity is not reflected in the exported Agent structure. Our example here covers a simple (albeit potentially extensive) FAQ case, but automatically generating the Agent should be considered whenever the Agent has a significant number of repeatable patterns that can be easily expressed with a spreadsheet or similar tool.