

Power Developer Productivity with Dev Containers
Power Developer Productivity with Dev Containers

Roman Mikhailov
Roman Mikhailov December 19, 2023
As a developer, I have always been drawn to the thrill of starting projects. The excitement of creating something new, the challenge of solving unique problems, and the potential for groundbreaking innovations keep me passionate about my field. However, amidst this intellectual journey, there’s one aspect that I, like many others, have often dreaded: the roadblocks to productivity that can emerge during the first few weeks of onboarding – particularly, getting the code to run.
It’s an all too familiar scenario. I’m excited about the fresh assignment, ready to dive in and learn new programming languages, frameworks, and business domains. I clone the code, and it does not build or does not run. Or, it stops running, because an environment variable was not set or a dynamic dependency did not load correctly. There’s outdated documentation, drifting configuration, key information that’s stored only in the head of the most senior dev team member, followed by the disconcerting realization that every developer on the team seems to be doing the same thing – but each is doing that thing slightly differently from everyone else.
Early hurdles like these can drain the enthusiasm out of even the most promising project. Is there a better way?
There is. The key lies in establishing uniform, replicable, and segregated environments for development. By the end of this post, you’ll have gotten an idea of how to supercharge your productivity and save hours, if not days when it comes to setting up and configuring your development environment, keeping documentation and walkthroughs updated, and efficiently collaborating with others. You’ll even be able to experience in a browser what you’ve learned – I’ve set up an open-source repository you can use to experiment and recreate your own dev environments.
Wait, DEV-ENV-AS-CODE is a Thing?
You might already be acquainted with technologies like Docker, Virtual Machines (VMs), and the concepts of Infrastructure as Code (IaC) in deploying isolated applications. My colleagues have explored some of them in their blog post How Custom Stacks Can Avert Resource Collisions. These methodologies can be extended to organize your development environment as well. This involves the scripted setup of various elements such as operating systems, protocols, extensions, tools, and the specific programming languages and frameworks you use.
This is precisely what development containers (or dev containers for short) are for. Through an open specification for enriching containers with development-specific content and settings, dev containers offer full-featured development environment configuration that lives together with your code – dev-env-as-code. This makes the configuration versionable, shareable, and fully reproducible. In this post, I’ll be using VS Code, but dev containers are supported by environments such as IntelliJ IDEA, too.
The devcontainer.json is a definition file that typically contains information about the operating system base image, commands, patches, tooling, and extensions needed during coding. You connect to it from VS Code by leveraging the “Remote-Containers” extension. This automatically starts the container and sets up an environment, downloading and installing your supporting programs, exposing necessary ports – and allowing you to code, test, and run your application in a seamless and local-like environment.
These dev containers resemble the deployment containers that one would run on Kubernetes. Although both rely on the same technology, they accomplish completely different goals. The deployment containers are supposed to be lean, lightweight, and for security reasons, hardened. By contrast, dev containers are relaxed and include elevated permissions, as well as debugging and development tools.
Dev Containers Offer Ample Productivity Upside
Dev containers might not be the right choice for everyone. For example, they do not currently support Windows-based images. They also rely on shared volumes with the host, which might introduce unwanted performance degradation or complexity. If your project depends on direct hardware access such as GPU, dev containers could hinder and complicate your setup. Like anything in software development, the answer to when they should be used is: “it depends”. You’ll have to just see them for yourself before deciding to adopt – and I’ll help you do just that, a little later!
Dev containers are easy to get started with and crucially, I’ve found them to be time savers in the long run. They offer significant benefits right off the bat.
Pros and Advantages
- Consistent & Portable Development Environments – Dev containers guarantee that every developer works on an identical, reproducible environment, which reduces “works on my machine” issues. I find this to be its biggest advantage. Handing over the code is as easy as sharing a link to your GitHub repository. On top of that, with the cloud-powered development environment, GitHub Codespaces, you only need a browser to get started.
- Reduced Setup and Takeoff Time – With a pre-configured and ready-to-use environment, developers can get to working with the code faster. This gain in productivity can be counted in hours and even days on some projects. Since a dev container is an isolated environment, it will not conflict with other applications and frameworks that you might have locally. There’s time savings in the ease of code sharing mentioned above, along with the benefit of no longer needing to rely on environment managers such as pyenv, nvm, or VirtualEnv.
- Transparency & Control – The dev container environments are under your complete command, allowing you to view and manage OS versions, patches, utilities, and instruments installed along with your code. By eliminating the noise that unrelated systems would have produced in conventional environments, this makes troubleshooting highly efficient.
- Self-Documentation – The dev container configuration serves as up-to-date documentation of what your code needs in order to be maintained, deployed, and executed. It also provides a list of tools and utilities that can be used in troubleshooting. Adding to the time savings, this configuration eliminates the need to maintain external wikis and README files – files that tend to become obsolete and outdated quite quickly.
Of course, like any technology there are some limitations.
Cons for Consideration
- Learning Curve – Using dev containers does not require a lot of effort (as you’ll see in the demo below), but creating their configuration does require knowledge of container technologies like Docker. The good news is that there are plenty of templates available online as a starting point. There are also many excellent productivity assistants you can choose from to help you with this, including big players like OpenAI’s ChatGPT, Github Copilot, Google Duet AI, and Amazon Q.
- Resource Consumption – Running containers can be resource-intensive, particularly when handling larger projects. Their convenience might lure you into thinking that they can be started on just any computer. As long as your computer can run Docker Engine you should be OK, but you still might need powerful hardware to work with containers efficiently. A workaround is to provision Virtual Machines in a cloud or a remote server on demand that meets your needs. This solution will come with a provisional cost, but the benefit of maintaining a “works locally” experience outweighs the cost – from this developer’s point of view, at least.
- Limitations You Need to Know – As with any new technology, it’s important to do your own due diligence and assess limitations and risks before adopting. For example, VS Code doesn’t support Windows container images. Before determining if you want to adopt dev containers in your organization, I recommend reviewing sources such as the list of active issues that Microsoft keeps to document what problems they are solving in their IDEs. If there’s currently unsupported tech that you absolutely have to use, then dev containers may not yet be ready for your project.
The Verdict: Dev Containers are Indispensable!
Despite this balanced presentation of upsides and downsides, overall, dev containers have left me very impressed. They’ve absolutely helped me to become more productive, especially when:
- Writing code that will be owned by someone else, such as demos or tutorials.
- Experimenting with or learning a new framework, language, or library.
- Modifying code on the go or from computers not set up for development.
In the past, the time spent setting up my PC, getting the code compiled and executed could take from hours to days; today it’s a click of a button and a few minutes.
Seems too good to be true? Give it a try yourself and check out the demo below.
Demo Your Dev Containers in GitHub Codespaces
With GitHub Codespaces, you can launch your dev containers from GitHub in the browser without even needing an IDE. All you need is a GitHub account. Let’s check out this awesome feature together.
This repository is going to demonstrate the power of dev containers on GitHub Codespaces using an example application written in Python with Gradio. I find Gradio’s web interface intuitive enough to make it the open-source library of choice when I want to quickly demo machine learning models that anyone can use, anywhere. In fact, it’s so easy that to follow this demo, you don’t need to know anything about Gradio, machine learning, or Python.
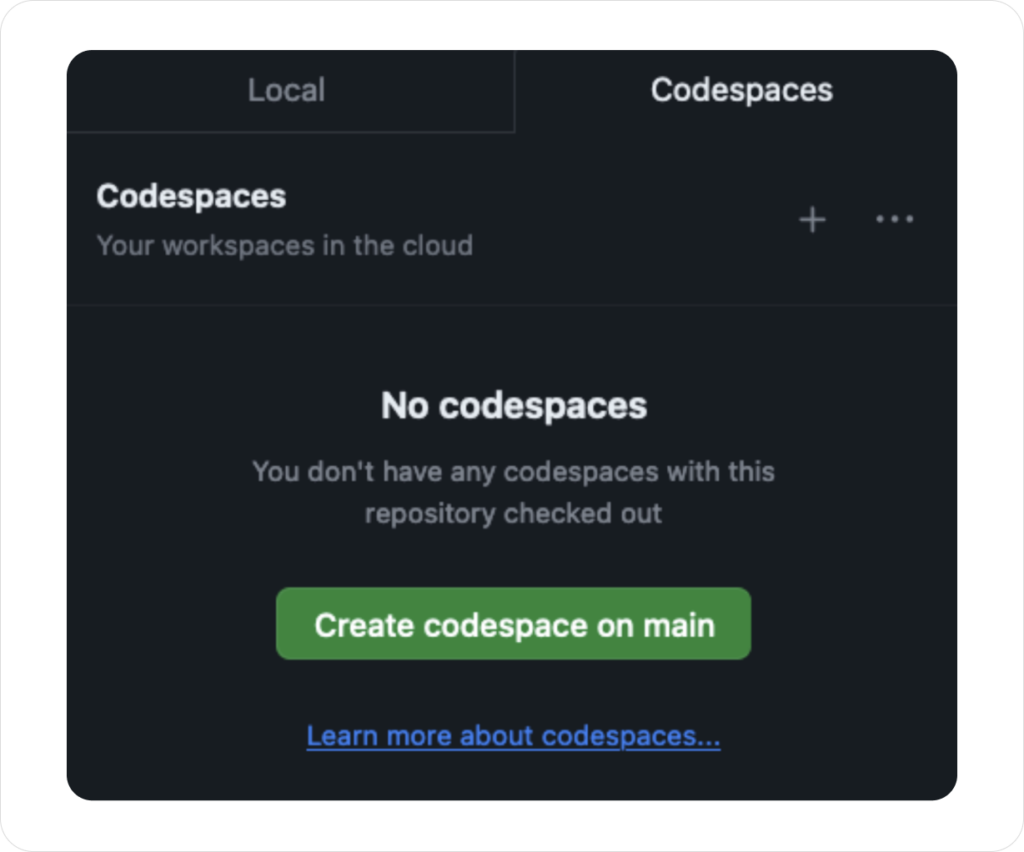
- Open https://github.com/Nuvalence/blog-gradio-example.
- Click Code.

3. Activate the Codespaces tab and click Create codespace on main.
4. Wait for the codespace to set up (this should take about 3-4 minutes).
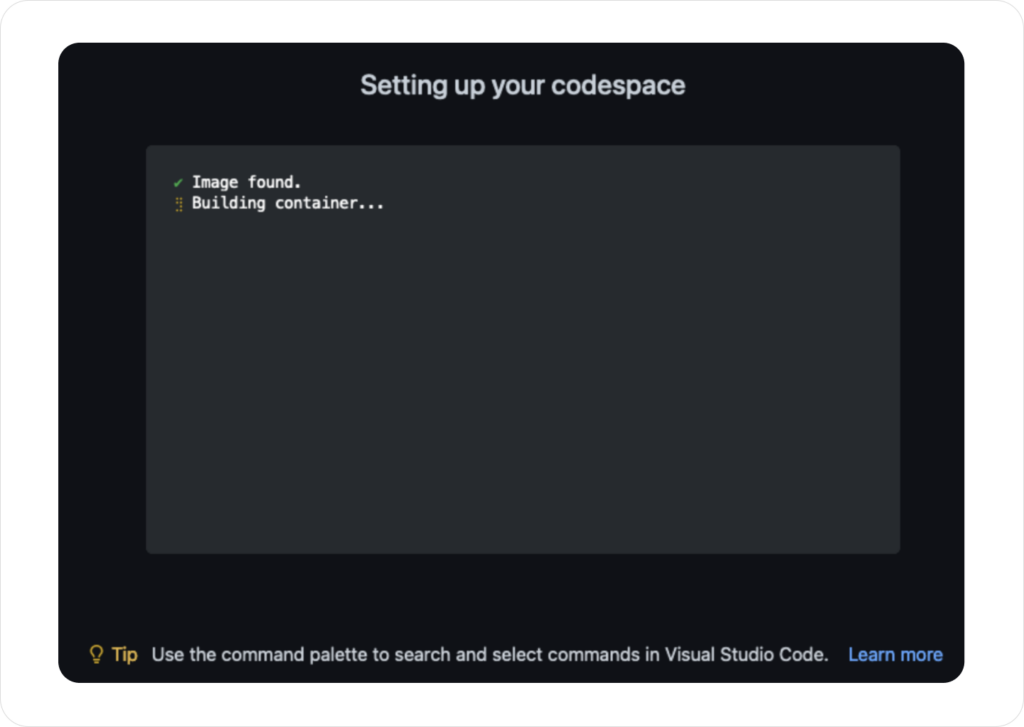
5. Once the vscode.dev is loaded, wait a few minutes for the postCreateCommand to finish. You will be able to follow its progress in the Terminal.
6. Run python main.py in the Terminal.
7. Click Open in Browser.

8. Optional: Modify the code as you like, and restart it!
You just downloaded an entire development environment, got it configured, and started an application in only a few minutes – with the ability to work on it immediately. Without dev containers, this process could have easily turned into hours.
Feel free to change the code and explore how this works with a project of your own. Once finished, don’t forget to delete the Codespace to avoid unnecessary storage charge accrual.
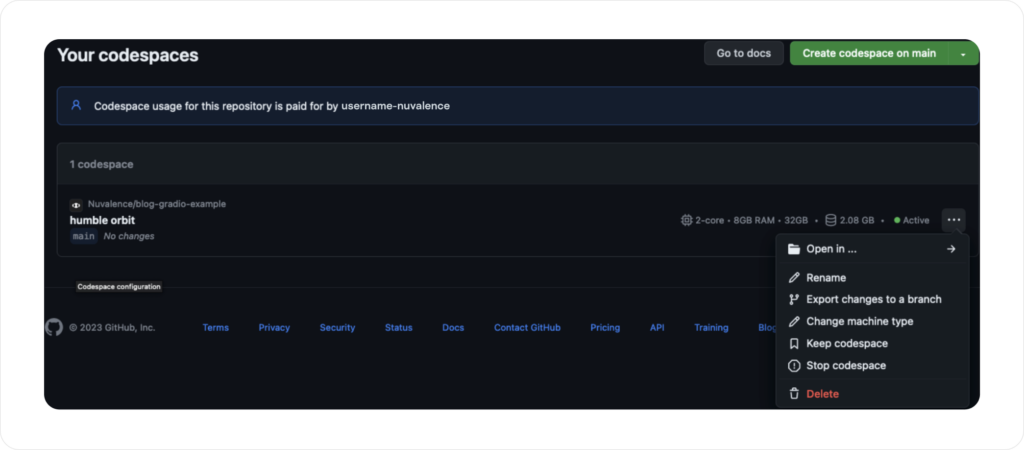
- Go to https://github.com/codespaces/
- Select the running codespace and simply click Delete.
Reproducible Dev Environments for the Win
Of course, this initial demonstration merely scratches the surface. I’m starting to experiment with much more complex configurations. Dev containers support Docker-in-Docker, where a Docker Service runs inside the dev container; and Docker-from-Docker, where Docker Service runs from inside the dev container but leverages the host Docker system. These features are useful for complex projects that rely on docker-compose and microservices that have to be started together. These are topics of their own, which I’ll explore in more depth in a future post.
Until then, I encourage you to follow the steps above and experiment with recreating containerized dev environments for your own use case. What I’ve shared with you here is one of many GitHub repositories that Nuvalence has made public. As long as the dev containers support your tech requirements, you and your fellow developers are certain to enjoy a productivity boost. Who knows – you might even rediscover the thrill of possibility that should rightfully be in the air when you’re starting new projects.