

Using an S3 Bucket as a Maven Repository
Using an S3 Bucket as a Maven Repository

Grant Boughton
Grant Boughton April 6, 2020
Code reuse isn’t a new topic to software developers, all of us at some point have imported a library or package into our project to use a convenient class or method. Although we’re all consumers of packages, being a producer requires some less common knowledge. Being able to easily reuse common code can improve productivity and ensure consistency across projects.
I’ve been working with a client who is using a variety of AWS services and wanted to create a reusable core library to use across multiple projects. They use Maven in all their projects, so I was told to find a solution that used Maven as well. One caveat was that the client needed to restrict access to the repository to only developers within the organization. Most developers have only been consumers, and haven’t had to think much about how a package makes it to the remote repository. But from a producer’s point of view, there are a few key decisions to consider. For example: it’s always important to think about cost. Storing artifacts in feature-rich, private repositories can be expensive, and depending on the use case you may not be leveraging the extra features effectively enough to be worth it. In our use case, we also had to consider security. By definition, anything in a public repository is available to the whole world, which in this case was not what we wanted.
Based on the requirements given to us and the customer’s existing environment, we chose to use an S3 bucket as a Maven repository. There are other options out there, but we chose S3 because it allows us to restrict access using IAM policies and, since it is a file repository without all the expensive features of a repository manager, we were able to keep costs low.
In this blog post I’ll explain how we used S3 and Maven to achieve this goal. If you haven’t had much exposure to S3 before, I would recommend looking at the docs to familiarize yourself with the general terminology before continuing. All you’ll need to get started is an AWS account, and Java and Maven installed on your computer.
Configure an S3 Bucket
First we need to create a new S3 bucket.
-
Open the AWS Console in your browser and select “Services” -> “S3” -> “Create Bucket”.
-
Give your bucket a name. I’ll be referring to the bucket I created as “nuvalence-maven-repo”, however bucket names must be globally unique so your bucket will need a different name.
-
Leave the remaining settings on their default configuration, just make sure “Block all public access” is selected and then click “Create Bucket”.
Once you’ve created the bucket, select it from the list of buckets and you should see the screen below.
-
Create two folders in the S3 bucket named “release” and “snapshot” by clicking the “Create Folder” button. These folders are where our deployed packages will be stored.

5. Create two folders in the S3 bucket named “release” and “snapshot” by clicking the “Create Folder” button. These folders are where our deployed packages will be stored.
Create a User
Now we have a private bucket created that nobody can access. To give specific people permissions we’ll create an IAM user that has access, and have them assume that user’s identity when needed.
{
    "Version": "2012-10-17",
    "Statement": [
        {
            "Sid": "VisualEditor0",
            "Effect": "Allow",
            "Action": ["s3:*"],
            "Resource": "arn:aws:s3:::<bucket_name_here>"
        }
    ]
}-
First create a user by navigating to “Services”->”IAM”->”Users”->”Add User”.
-
Enter a name for your user and select “Programmatic access” so we’ll have a secret key to use for authentication.
-
Click the “Next: Permissions” button to go to the next step where we’ll give this user access to the S3 bucket. Select “Attach existing policy directly” and then “Create Policy” to open the policy builder in a new tab.
-
In the builder click the “JSON” tab, and paste the following JSON, be sure to replace the placeholder in “Resource” with the name of your bucket before clicking the “Review Policy” button.
{
    "Version": "2012-10-17",
    "Statement": [
        {
            "Sid": "VisualEditor0",
            "Effect": "Allow",
            "Action": ["s3:*"],
            "Resource": "arn:aws:s3:::<bucket_name_here>"
        }
    ]
}
5. In the review page give your policy a name, I chose maven-repo-access, then click “Create Policy”. You should be brought to a list of policies with a message at the top confirming the creation of your policy.
6. Now you can go back to the tab where we were creating our user and attach your new policy. You may have to click the refresh button at the top of the list for your new policy to appear.

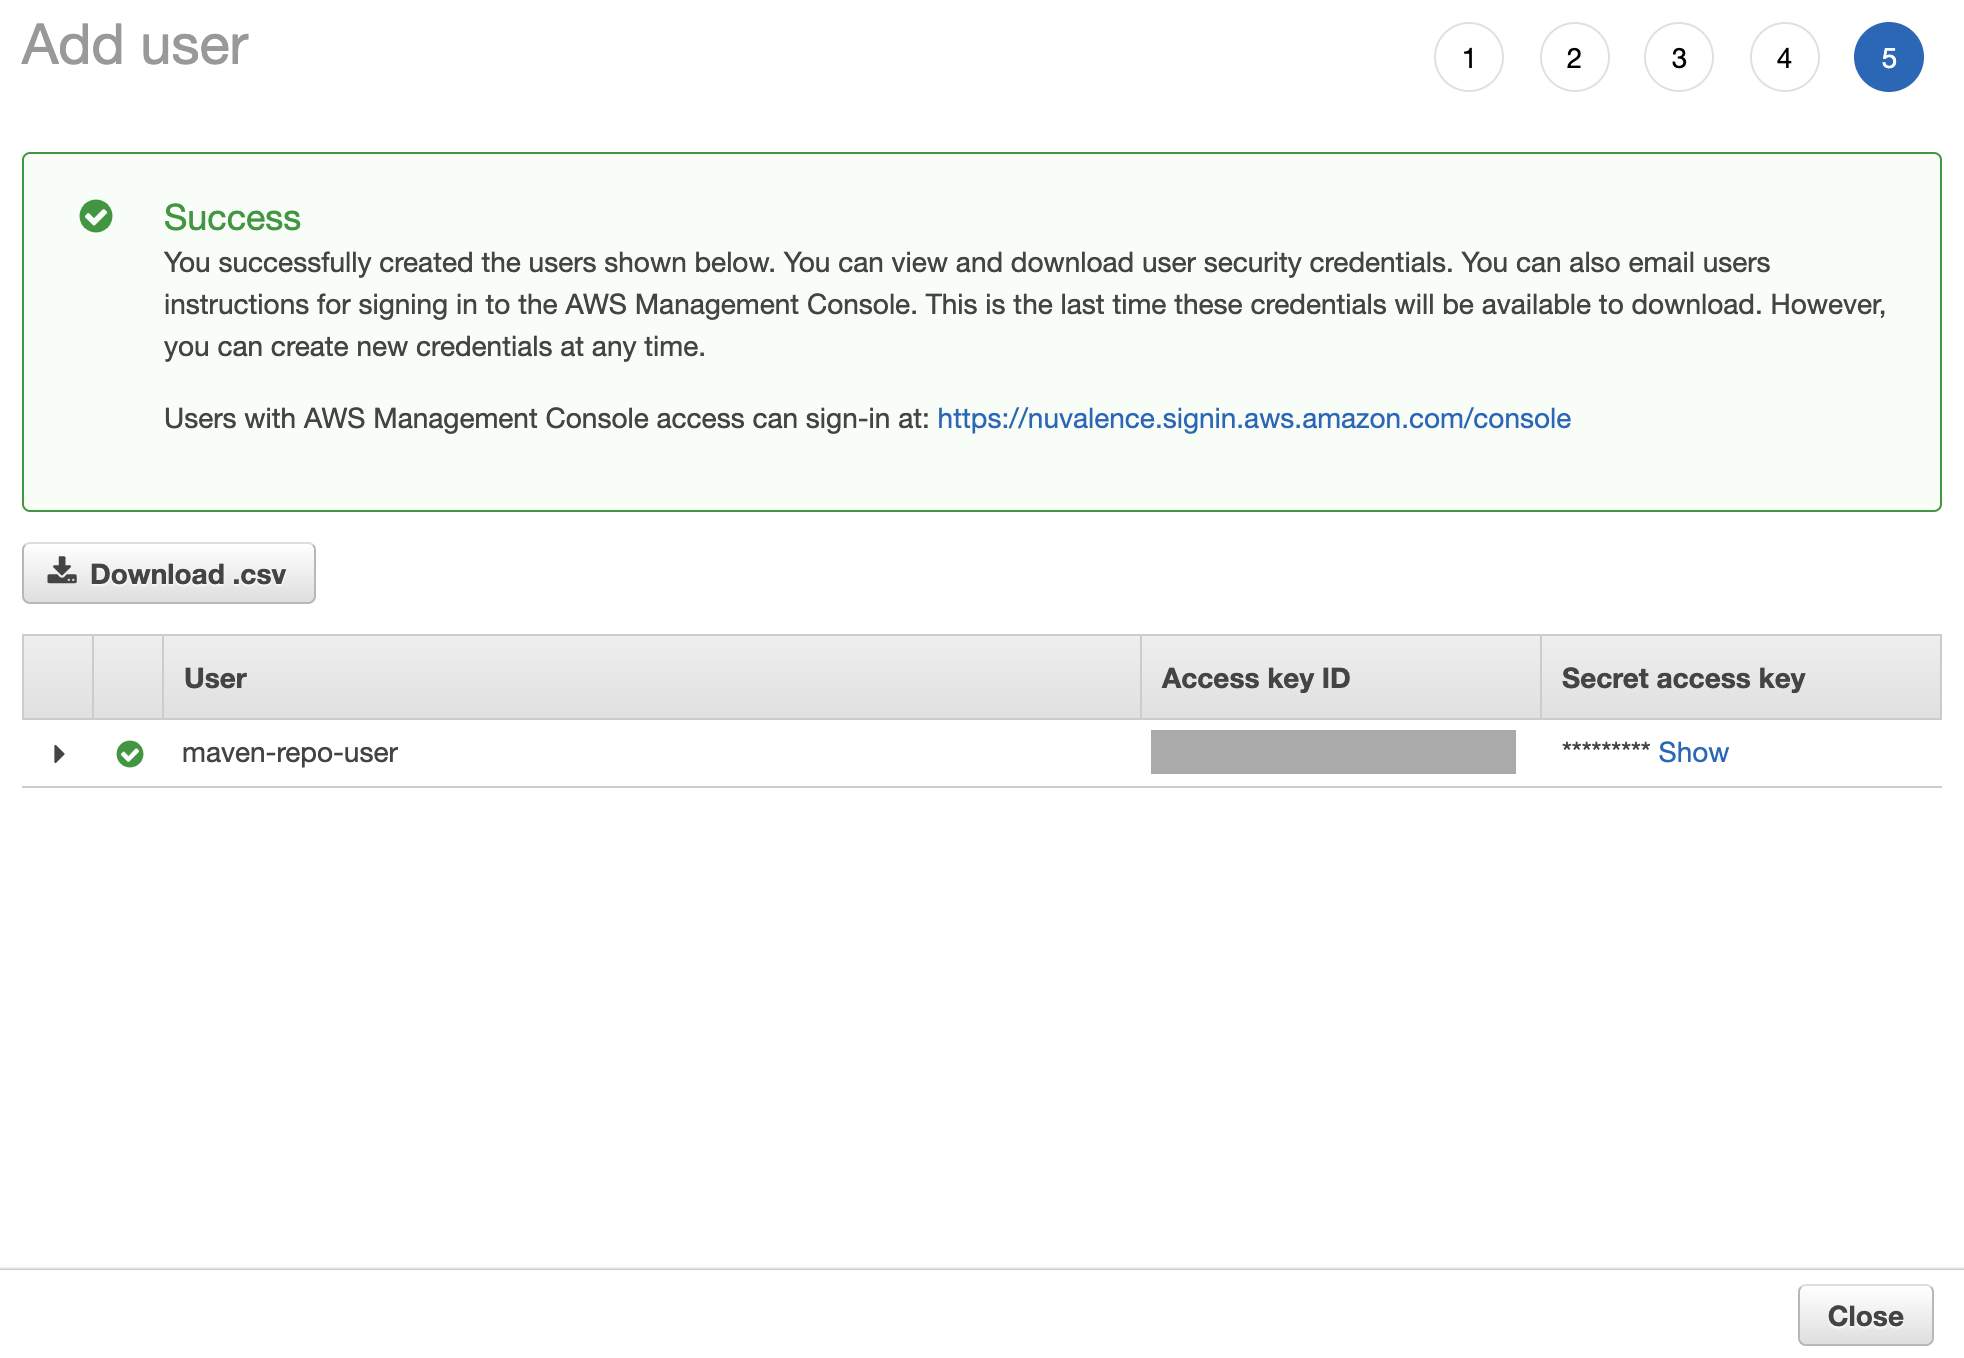
7. We’ll leave the default values for the rest of the configuration, so click “Next” until you reach the review screen, then click “Create User”. This should bring up a confirmation screen containing our secret access keys we need to authenticate. Make sure you copy these down or download the csv Amazon provides as you will need them later. Be careful about sharing these keys, anyone with the keys can get access to your S3 bucket.
Configure the Project
Once we have our repository and user configured, it’s time to set up our code to deploy. We’ll do this by telling Maven what repository to deploy the code to, and what credentials to use when accessing that repository.
First we’ll add the credentials to Maven, this can be done globally by extending our Maven setting file (found at ~/.m2/settings.xml) or by creating a settings.xml file at the root directory of your project and referencing that in the deploy command. If you are new to Maven, or aren’t sure which approach to take, I would recommend just creating a settings.xml file in the project. Regardless of the path you decide to take, add the following to your settings.xml file:
<settings>
    <servers>
        <server>
            <id>maven.nuvalence.repo</id>
            <username><ACCESS_KEY_ID></username>
            <password><SECRET_ACCESS_KEY></password>
        </server>
    </servers>
</settings>
The ID we choose here doesn’t matter, it’s just what we will use later to refer to this set of credentials. Make sure you replace the placeholder values with the key generated for the user we created earlier.
Next we’ll update our pom.xml file to deploy to the S3 bucket. When editing any xml file, remember that any additions must be within the correct tag, so you won’t be able to just copy and paste everything in. That being said, now add the following parts to your pom.xml file:
<project>
    <build>
        <extensions>
            <extension>
                <groupId>com.github.seahen</groupId>
                <artifactId>maven-s3-wagon</artifactId>
                <version>3.8.0</version>
            </extension>
        </extensions>
    </build>
    <distributionManagement>
        <repository>
            <id>maven.nuvalence.repo</id>
            <url>s3://<BUCKET_NAME>/release</url>
        </repository>
        <snapshotRepository>
            <id>maven.nuvalence.repo</id>
            <url>s3://<BUCKET_NAME>/snapshot</url>
        </snapshotRepository>
    </distributionManagement>
</project>
Once you’ve finished updating your pom.xml file, confirm that you have replaced the placeholders with your bucket name and that the repository ID matches what was defined in settings.xml.
One notable addition is the maven-s3-wagon extension we are using. A wagon is just a plugin that allows us to transport our artifacts around, this specific one is for transporting artifacts to S3 buckets. There are many to choose from, however in my experience some of the first to come up in google searches are out of date and no longer supported. At the end of the day they all do the same thing, but if you decide to use a different one, make sure it’s still being maintained.
The added distribution Management tag is where we actually declare where to deploy our packaged code to. By having separate folders for snapshot and release versions we are able to better organize our repository. This will be helpful in the long run since we aren’t using a managed repository service, we have to handle removing old versions and general upkeep.
Deploy the Package
The last thing to do is to actually deploy the package. Simply enter the following command in the terminal:
mvn --settings settings.xml clean deploy If you set your credentials globally in ~/.m2/settings.xml you should remove the –settings flag. This deploy command will remove any old builds of your code, then package everything together and deploy it to the repository. Maven checks the pom.xml file for the version tag, and if it includes “SNAPSHOT” your package will be put in the snapshot folder, otherwise it will be added to the release folder. And just like that, your code is out there for others to use.
Use the Deployed Package
The final point we’ll talk about is how to actually use your package once it’s been deployed. A lot of the steps are similar to deploying the package; we need to tell Maven where to look for our dependencies, and what credentials to use to gain access.
-
Copy the settings.xml file we made earlier and paste it into the consuming project’s root directory. You can skip this step if you edited your global Maven settings earlier instead of creating a new file.
-
Add your deployed package as a dependency using the same groupId, artifactId, and version defined in the pom.xml when you deployed it.
-
Just like before we will add a wagon to transport artifacts from our S3 bucket, as well as define what repository to pull from. To do so, add the following to your project’s pom.xml file:
<project>
    <repositories>
        <repository>
            <id>maven.nuvalence.repo</id>
            <url>s3://<BUCKET_NAME>/release</url>
        </repository>
<repository>
            <id>maven.nuvalence.repo</id>
            <url>s3://<BUCKET_NAME>/snapshot</url>
        </repository>
    </repositories>
    <build>
        <extensions>
            <extension>
                <groupId>com.github.seahen</groupId>
                <artifactId>maven-s3-wagon</artifactId>
                <version>3.8.0</version>
            </extension>
        </extensions>
    </build>
</project>
Conclusion
With that you should be all set to deploy and use custom packages using an S3 bucket as a repository. Hopefully this blog post has proven helpful, and if you have any questions, comments, or concerns, feel free to leave a comment or reach out on LinkedIn.